Another Glenwood Modern Oak 116

 
Steelhorse
Member
Posts: 23
Joined: Wed. Oct. 03, 2012 9:25 pm
Location: Wilbraham, MA
Hand Fed Coal Stove: Glenwood MO 116
Coal Size/Type: Bulk Nut

Post by Steelhorse » Sun. Oct. 07, 2012 4:30 pm

Here it is...my very own Glenwood MO 116. It was handed down to me from my grandfather who purchased it at a yard sale back the 50s for a mere $25.

Image

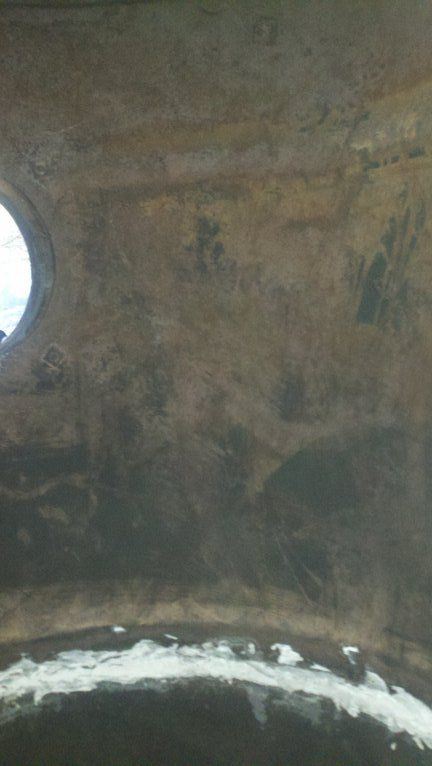
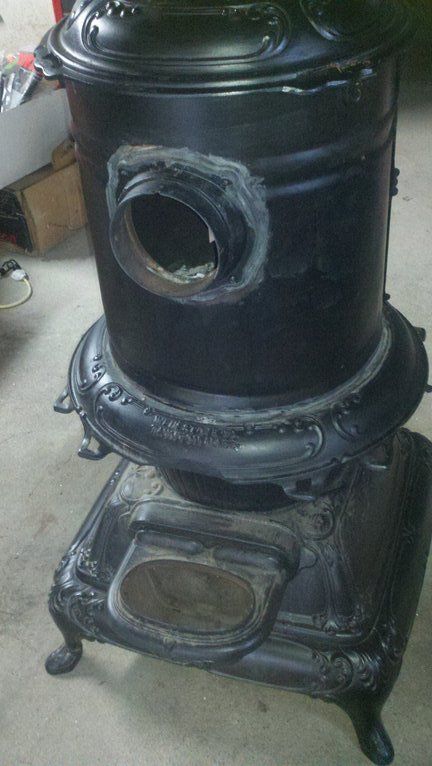
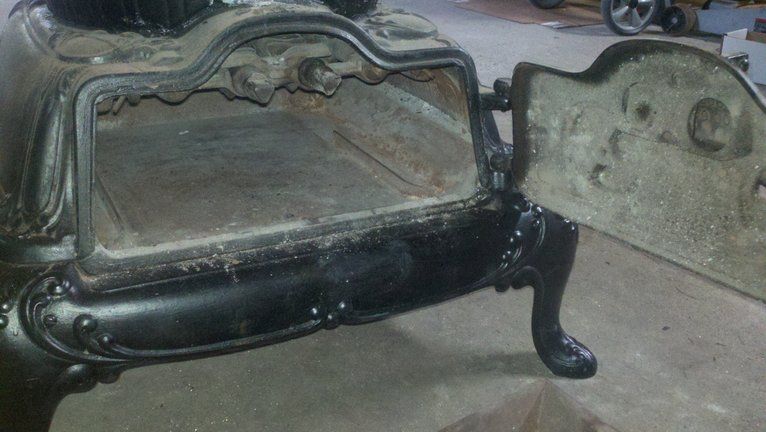
As you can see in the next two pictures, the firepot was cracked vertically from the primary draft controls to the face plate and at some point was welded and patched.

Image
Image

I'd take a guess the crack was the result of probably years and years of burning without a refractory lining of any kind. You can see the grates are in decent shape and they rotate with ease and without hanging up.

Image

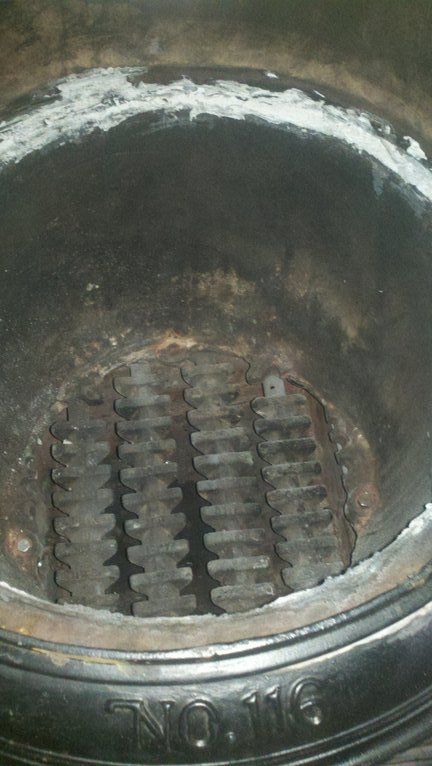
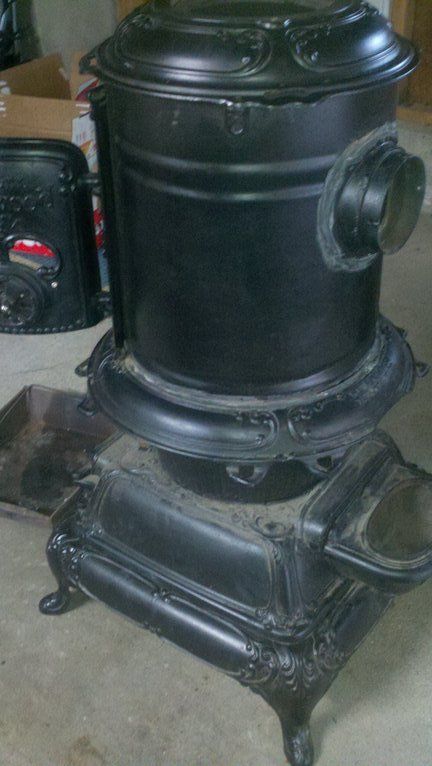
Cap screws were utilized in holding the face together for some reason...very chic (very sarcastic). The secondary draft control is very loose with almost no resistance.

Image

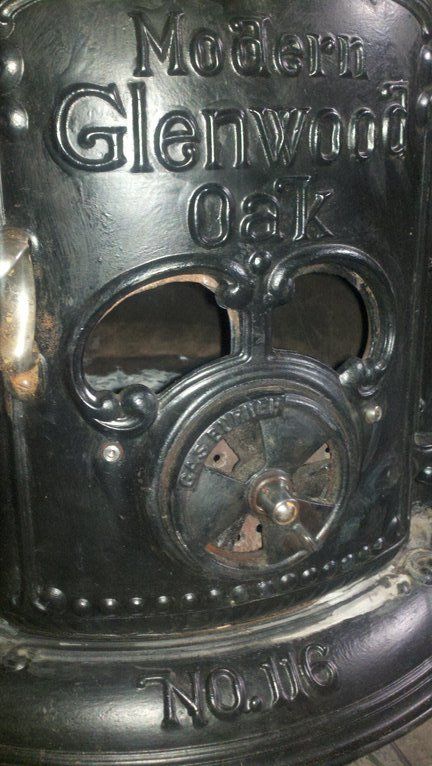
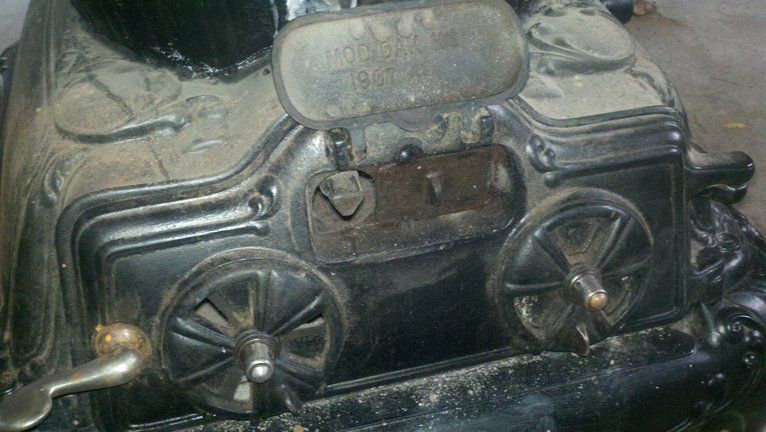
The primary draft controls are still tight with a very positive response from the springs. The shaker access door is in good shape with the divider plate still in tact, but a little tough to slide.

Image
Image

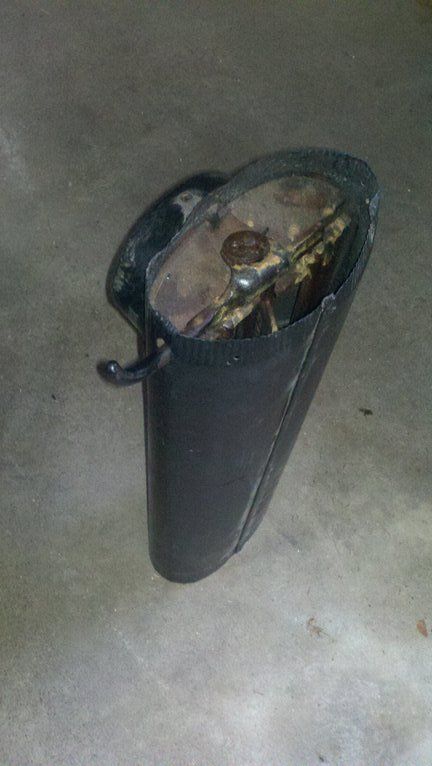
The exhaust pipe has seen better days, but still has the internals that are a little worn. Can someone tell me why there is no direct vent exit? It seems like the top hat that should be there is not, and the only exit is straight up.

Image
Image

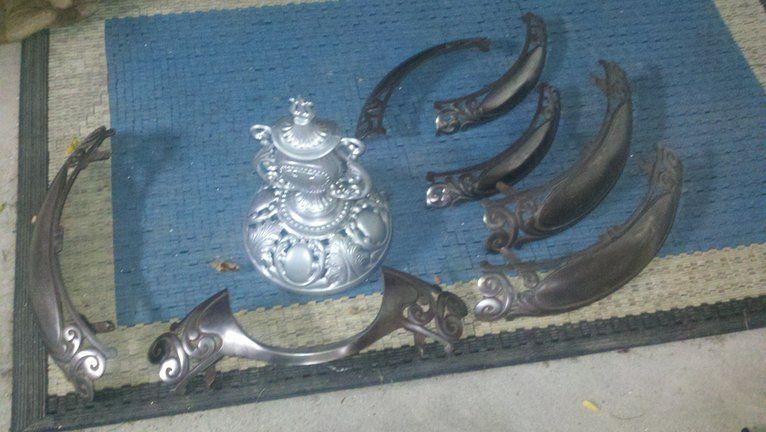
The nickel finish on the trim is worn, and all the pieces are there except for the rear piece for the top trim ring. And for whatever reason my grandfather decided to french chrome the finial...so that'll need some attention.

Image


Steelhorse
Member
Posts: 23
Joined: Wed. Oct. 03, 2012 9:25 pm
Location: Wilbraham, MA
Hand Fed Coal Stove: Glenwood MO 116
Coal Size/Type: Bulk Nut

Post by Steelhorse » Sun. Oct. 07, 2012 4:31 pm

The shaker handle is in great shape but the warmer lid handle doesn't appear to be the correct size for the lid...the wood handle is a nice touch, though.

Image

The inside of the cylinder is decent, but the bottom of it is rusted along the channel where it meets the bottom skirt.

Image
Image
Image

 
Steelhorse
Member
Posts: 23
Joined: Wed. Oct. 03, 2012 9:25 pm
Location: Wilbraham, MA
Hand Fed Coal Stove: Glenwood MO 116
Coal Size/Type: Bulk Nut

Post by Steelhorse » Sun. Oct. 07, 2012 4:34 pm

As I was starting the tear-down today, I came to a standstill with the four screws holding the bottom skirt to the firepot. The screw heads keep wanting to strip out on top. Aside from using a propane or mapp gas torch to heat the square nuts from below and hopefully getting them to expand a bit...any tricks?

 
PJT
Member
Posts: 456
Joined: Fri. Jan. 06, 2012 11:11 pm
Location: South Central CT
Baseburners & Antiques: Magee Royal Oak; Glenwood Modern Oak 116
Other Heating: propane

Post by PJT » Sun. Oct. 07, 2012 4:48 pm

maybe PC blaster to loosen them up? If you ruin the heads of the screws you can get damaged screw removal tools from places like Sears

nice stove by the way I have the exact same one Im starting to restore only I don't have the divided back pipe option 8( mine must have been sold as a wood only model?

 
User avatar
echos67
Member
Posts: 625
Joined: Tue. Feb. 22, 2011 7:26 am
Location: Maryland and Wanting Out !!

Post by echos67 » Sun. Oct. 07, 2012 4:57 pm

Looking forward to its restoration, as for the screws I came across in my No 6 that I am in the middle of restoring I just took a hammer and chisel and popped them off from inside. I was nervous at first thinking it may crack the cast but it worked in my case without issue and only took a couple hits each.

 
User avatar
nortcan
Member
Posts: 3146
Joined: Sat. Feb. 20, 2010 3:32 pm
Location: Qc Canada

Post by nortcan » Sun. Oct. 07, 2012 5:09 pm

Welcome to the forum Steelhorse. That stove can become a very good and nice stove with a little work on it. Just take the time to do it the best you can.
Before I got the Golden Bride, I almost bought one like that.
BTW, what means ""french chrome"" :?: Never saw ""french chrome"" around here in Québec :lol:

 
Steelhorse
Member
Posts: 23
Joined: Wed. Oct. 03, 2012 9:25 pm
Location: Wilbraham, MA
Hand Fed Coal Stove: Glenwood MO 116
Coal Size/Type: Bulk Nut

Post by Steelhorse » Sun. Oct. 07, 2012 6:10 pm

Thanks for the responses guys. I've tried the PB Blaster already but I may just try the hammer/chisel technique on those screws!

nortcan - I must appologize...it's kind of a negative connotation to the cheap chrome paint that is made to look like chrome. I've heard it used a few times. But I'm part French Canadian myself...so it's alright to use it, right?? ;)

I already talked to the area restorers and no one has another firepot to use so I'm most likely going to have to have Auburn cast me a new one.
Depending on the time available to me, I may just get the necessary parts and have the Stove Hospital do the task...time is a commodity I just don't have and I'd like to get this thing roaring for the upcoming season. I spoke to them last week and they were a wealth of knowledge and only about 1.5 hrs away from me...bonus!


PJT
Member
Posts: 456
Joined: Fri. Jan. 06, 2012 11:11 pm
Location: South Central CT
Baseburners & Antiques: Magee Royal Oak; Glenwood Modern Oak 116
Other Heating: propane

Post by PJT » Sun. Oct. 07, 2012 6:21 pm

Obviously be very careful if you use the hammer/chisel method very easy to crack cast iron
amazing that pc blaster didnt work at all..how long did you let it soak?...Ive also used automatic transmission fluid with some success in the past....

 
User avatar
nortcan
Member
Posts: 3146
Joined: Sat. Feb. 20, 2010 3:32 pm
Location: Qc Canada

Post by nortcan » Sun. Oct. 07, 2012 6:53 pm

Here is what we call ""french chrome"" in Qc. and the nickel finish has the real yellowish look as need for an antique stove, but not visible on the photos.
The guy who did the nickel jobs on my stoves in Blacklake, told me that they re-chrome lots of parts having a poor job made in USA. :lol:

Attachments

DSC04723.JPG
.JPG | 110.7KB | DSC04723.JPG
DSC04719.JPG
.JPG | 109.5KB | DSC04719.JPG
DSC03087.JPG
.JPG | 93.4KB | DSC03087.JPG
DSC03089.JPG
.JPG | 156.8KB | DSC03089.JPG

 
Steelhorse
Member
Posts: 23
Joined: Wed. Oct. 03, 2012 9:25 pm
Location: Wilbraham, MA
Hand Fed Coal Stove: Glenwood MO 116
Coal Size/Type: Bulk Nut

Post by Steelhorse » Sun. Oct. 07, 2012 7:39 pm

Damn! I think I need sunglasses looking at that set! :shock:

:idea: PJT - I was just thinking, I may try using a dremel instead...a little more control and a lot less impact. I'll let you know how it goes! :idea:

 
PJT
Member
Posts: 456
Joined: Fri. Jan. 06, 2012 11:11 pm
Location: South Central CT
Baseburners & Antiques: Magee Royal Oak; Glenwood Modern Oak 116
Other Heating: propane

Post by PJT » Sun. Oct. 07, 2012 9:24 pm

Good Luck!

 
User avatar
wsherrick
Member
Posts: 3744
Joined: Wed. Jun. 18, 2008 6:04 am
Location: High In The Poconos
Hand Fed Coal Stove: Glenwood Base Heater, Crawford Base Heater
Baseburners & Antiques: Crawford Base Heater, Glenwood, Stanley Argand
Coal Size/Type: Chestnut, Stove Size

Post by wsherrick » Mon. Oct. 08, 2012 2:50 am

Take your time with it. If you want to get it done right and have it soon, take it to Emery. As far as the back pipe not having its cap, somebody along the way replaced the original pipe and ran it straight up. For some reason this seems to happen quite often. It will work correctly with the original configuration. Thanks for sharing and we want to hear about your progress as you move along.

 
Steelhorse
Member
Posts: 23
Joined: Wed. Oct. 03, 2012 9:25 pm
Location: Wilbraham, MA
Hand Fed Coal Stove: Glenwood MO 116
Coal Size/Type: Bulk Nut

Post by Steelhorse » Mon. Oct. 08, 2012 8:28 am

Thanks for clearing the up William. I kinda figured that was the case with the back pipe.

I have to say I lurked on here for about a month and looked over SteveZee's restoration thread almost daily and I've watched your videos at least a dozen times.

This forum is a wealth of knowledge...thanks guys!

 
User avatar
SteveZee
Member
Posts: 2512
Joined: Wed. May. 11, 2011 10:45 am
Location: Downeast , Maine
Hand Fed Coal Stove: Glenwood Modern Oak 116 & Glenwood 208 C Range

Post by SteveZee » Mon. Oct. 08, 2012 10:36 am

Good going Steelhorse. Is the welded crack the only problem with the pot? If so and you wanted to use it this year you could put the refractory in it and you'd probably be good to go till you found or had a new one cast. That is if the integrity of the weld and pot is good. Obviously you want to get a new one for the aesthetics and to know it's solid. The rest of it will be a good inspection of the jacket and backpipe which are easily replaceable if need be and "gluing and screwing" it back together. I suppose though if you are taking it all apart, then the pot is best gotten now so that you don't have to repeat it all again.

You need to find that top cover for the back pipe. That won't be nearly as hard to come by as a pot I would think and worse comes to worse yo can make one like Eddie (PC12-47-E) did for his 116 back last year. If you do replace that back pipe, the seam should the other way round facing in towards the stove body so that you have smooth cut for the exhaust collar that you're stove pipe connects too. You may need one of those also, (exhaust collar) It's the same thing as is on the other side connecting to the stove jacket collar.

Keep the pix and questions coming and we'll do what we can to help. By the way the grates look in great shape which is great! ;) and if they mesh and turn well leave them alone.

I'm leaving for Mass in a hour and will actually be pretty close to where your at (Lanesboro, Ma) but I have a ton to do and only a few days to do it or I'd stop by and help you. You look like your doing fine though and any one of these guys can talk you through any probs if you run into any. Oh and lastly that lifter isn't the original one as you guessed. The original is just the usual spring handled type. You can find one on ebay under antique stoves easily. They are pretty generic.
Last edited by SteveZee on Mon. Oct. 08, 2012 11:04 am, edited 3 times in total.

 
User avatar
SteveZee
Member
Posts: 2512
Joined: Wed. May. 11, 2011 10:45 am
Location: Downeast , Maine
Hand Fed Coal Stove: Glenwood Modern Oak 116 & Glenwood 208 C Range

Post by SteveZee » Mon. Oct. 08, 2012 10:58 am

PJT wrote:maybe PC blaster to loosen them up? If you ruin the heads of the screws you can get damaged screw removal tools from places like Sears

nice stove by the way I have the exact same one Im starting to restore only I don't have the divided back pipe option 8( mine must have been sold as a wood only model?
Yep yours would have been direct draft and wood or bit coal only. If you can find that back pipe base piece and the internals (or make some up), you could convert it for ant coal. They really are more efficient burning anthracite with the divided back pipe because it lengthens the flame path and exchanges out allot more heat before the stack.

I love seeing all these Glenwoods coming to life here! The more the merrier. :D


Post Reply

Return to “Antiques, Baseburners, Kitchen Stoves, Restorations & Modern Reproductions”