WL110 Plumbed in...Now on to the Wiring.


-
Sting

- Member
- Posts: 2983
- Joined: Mon. Feb. 25, 2008 4:24 pm
- Location: Lower Fox Valley = Wisconsin
- Other Heating: OBSO Lennox Pulse "Air Scorcher" burning NG
Description appears to require a new and different "installer"
maybe one a little more versed in wet system plumbing
- zone valves are a nightmare
maybe one a little more versed in wet system plumbing
- zone valves are a nightmare
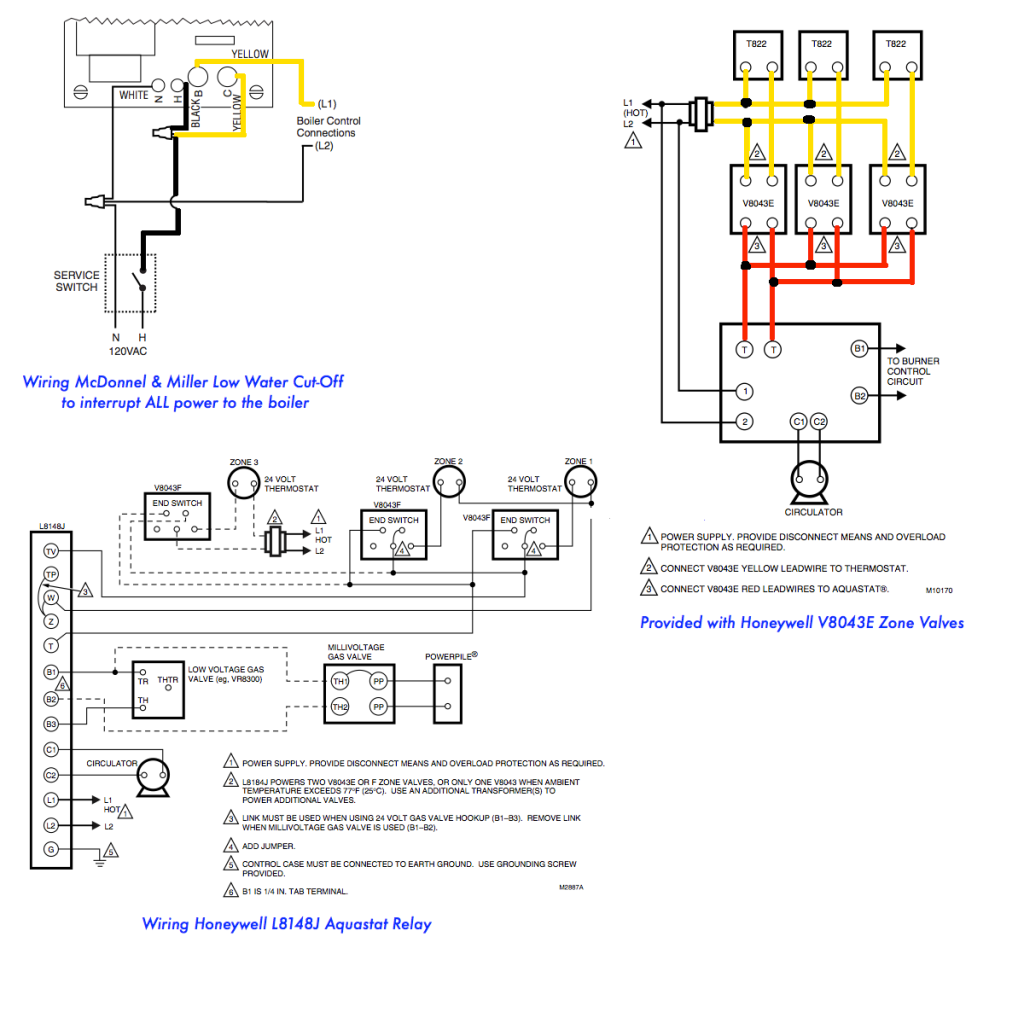
How do I connect the power in to this thing? I don't understand this diagram as far as connect the power in to and out to the switch.
Look here at top left diagram:
H and N = L1 and L2 = Black (and sometimes Red) and White
 [/quote]
Look here at top left diagram:
H and N = L1 and L2 = Black (and sometimes Red) and White
[/quote]-
Sting
- Member
- Posts: 2983
- Joined: Mon. Feb. 25, 2008 4:24 pm
- Location: Lower Fox Valley = Wisconsin
- Other Heating: OBSO Lennox Pulse "Air Scorcher" burning NG
if your having trouble with these clear drawings above
well I recommend you look at these first
or call in an outside contractor
http://store.heatinghelp.com/pindex.asp
see book 104
265
238
208
and or 214
well I recommend you look at these first
or call in an outside contractor
http://store.heatinghelp.com/pindex.asp
see book 104
265
238
208
and or 214
Perhaps I wasn't clear. I need run from the fused switch to the LWCO. I have never worked with a fused switch so I am not certain how to approach the fused switch.
Sting wrote:if your having trouble with these clear drawings above
well I recommend you look at these first
or call in an outside contractor
http://store.heatinghelp.com/pindex.asp
see book 104
265
238
208
and or 214

I finally made it this far!McGiever wrote:Don't be overwhelmed...your part is very tiny.Z10396 wrote:Appendix C is chinese math to me, doesn't help me in the least.
Top right on pg. 15. Your circuit...L1 (black), L2 (white) and ground (green or bare).
Directly to the left of that...Your Fused Switch replaces the factory switch (if yours fits in existing factory box)
Remember: Switch only the black and/or red wires and splice all the white wires in 1 big wire nut.
Let me know when you have that much done.
-
McGiever

- Member
- Posts: 10130
- Joined: Sun. May. 02, 2010 11:26 pm
- Location: Junction of PA-OH-WV
- Stoker Coal Boiler: AXEMAN-ANDERSON 130 "1959"
- Hand Fed Coal Boiler: BUCKET A DAY water heater
- Hand Fed Coal Stove: Warm Morning 414A
- Coal Size/Type: PEA,NUT,STOVE /ANTHRACITE
- Other Heating: Ground Source Heat Pump and some Solar
In your case, the circulator needs wired into Taco panel... not aquastat.Z10396 wrote:I've gotten as far as the circulator. Which on goes to C1 and which to C2 on the aquastat?
I'm going to upgrade the zone valves, I had a guy come over and he told me mine are a nightmare to figure out. I may try to sell the Taco panel to recoop some of my expense.McGiever wrote:In your case, the circulator needs wired into Taco panel... not aquastat.Z10396 wrote:I've gotten as far as the circulator. Which on goes to C1 and which to C2 on the aquastat?
So, I am going to try putting my old zone valves back on and connecting to the taco controller. I will attach some pics here. So, I assuming that these truly are two wire zone valves with no end switch, there is only the yellow and orange wire. As in the diagram, one wire to 1, one wire to 2, jumper a wire from 3 to 4 due to no end switch. Yellow to 1 or to 2? The diagram seems pretty straight forward. Tips and advice appreciated. The connection to the thermostats is super simple, red to red, white to white. The circulator, just the two wire as shown? Does it matter which wire to which connection? What is the dry contact portion and does it come in to play for my set up? I am starting to get much more comfortable now.
Attachments
-
McGiever
- Member
- Posts: 10130
- Joined: Sun. May. 02, 2010 11:26 pm
- Location: Junction of PA-OH-WV
- Stoker Coal Boiler: AXEMAN-ANDERSON 130 "1959"
- Hand Fed Coal Boiler: BUCKET A DAY water heater
- Hand Fed Coal Stove: Warm Morning 414A
- Coal Size/Type: PEA,NUT,STOVE /ANTHRACITE
- Other Heating: Ground Source Heat Pump and some Solar
Do this and you're good to go.
Not sure what that installer meant by being difficult. Hardest part for me was using Paint...don't laugh.

Not sure what that installer meant by being difficult.
Do this and you're good to go.
Don't worry, I won't laugh at a guy that has stuck with me this far! That makes it even simpler. Just a few more questions. Does it matter which wires (orange and yellow) from the zone valve that I connect in to 1 and 2 on the controller? Secondly to the circulator. Its the hot L1 (to switch) from the transformers to the left side of the pump end switch portion of the controller then from the right side of it to the cirulator. Connect to both circulator wires? I can almost feel it getting toasty in here now!McGiever wrote:Do this and you're good to go.
Not sure what that installer meant by being difficult.
